How it works
The PiKon is a telescope that uses 3D printed parts and a Raspberry Pi with camera to capture images.
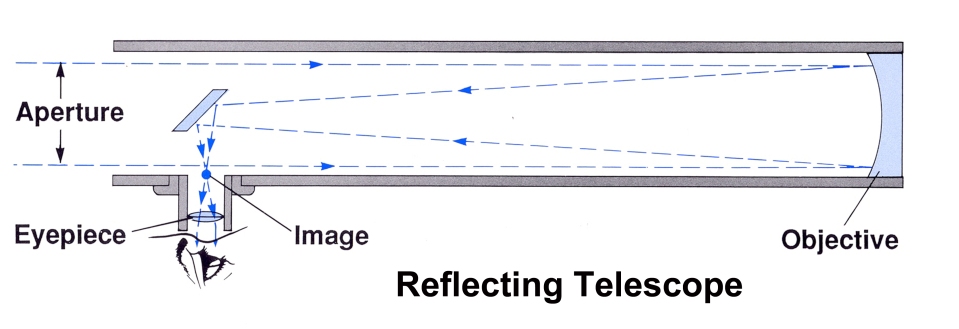
A conventional (Newtonian) reflecting telescope uses a concave mirror (objective) to form an image which is then examined with an eye piece. So that you don’t get your head in the way while viewing, there is a 45 degree mirror placed in the telescope tube and the eye piece is mounted on the side with a focusing rack.

In the PiKon design, the Raspberry Pi camera is placed in the tube with no 45 degree mirror. The size of the camera printed circuit board (PCB) is 24mm x 24mm, about the same size as the 45 degree mirror.
The lens of the Raspberry Pi camera is removed, exposing the camera sensor. The objective mirror is 4.5 inches diameter (113mm) and a focal length of about 600mm.
The telescope is operated using a Raspberry Pi computer, keyboard and monitor. Full details are in our assembly instructions.
The PiKon telescope has a magnification factor of about x160.
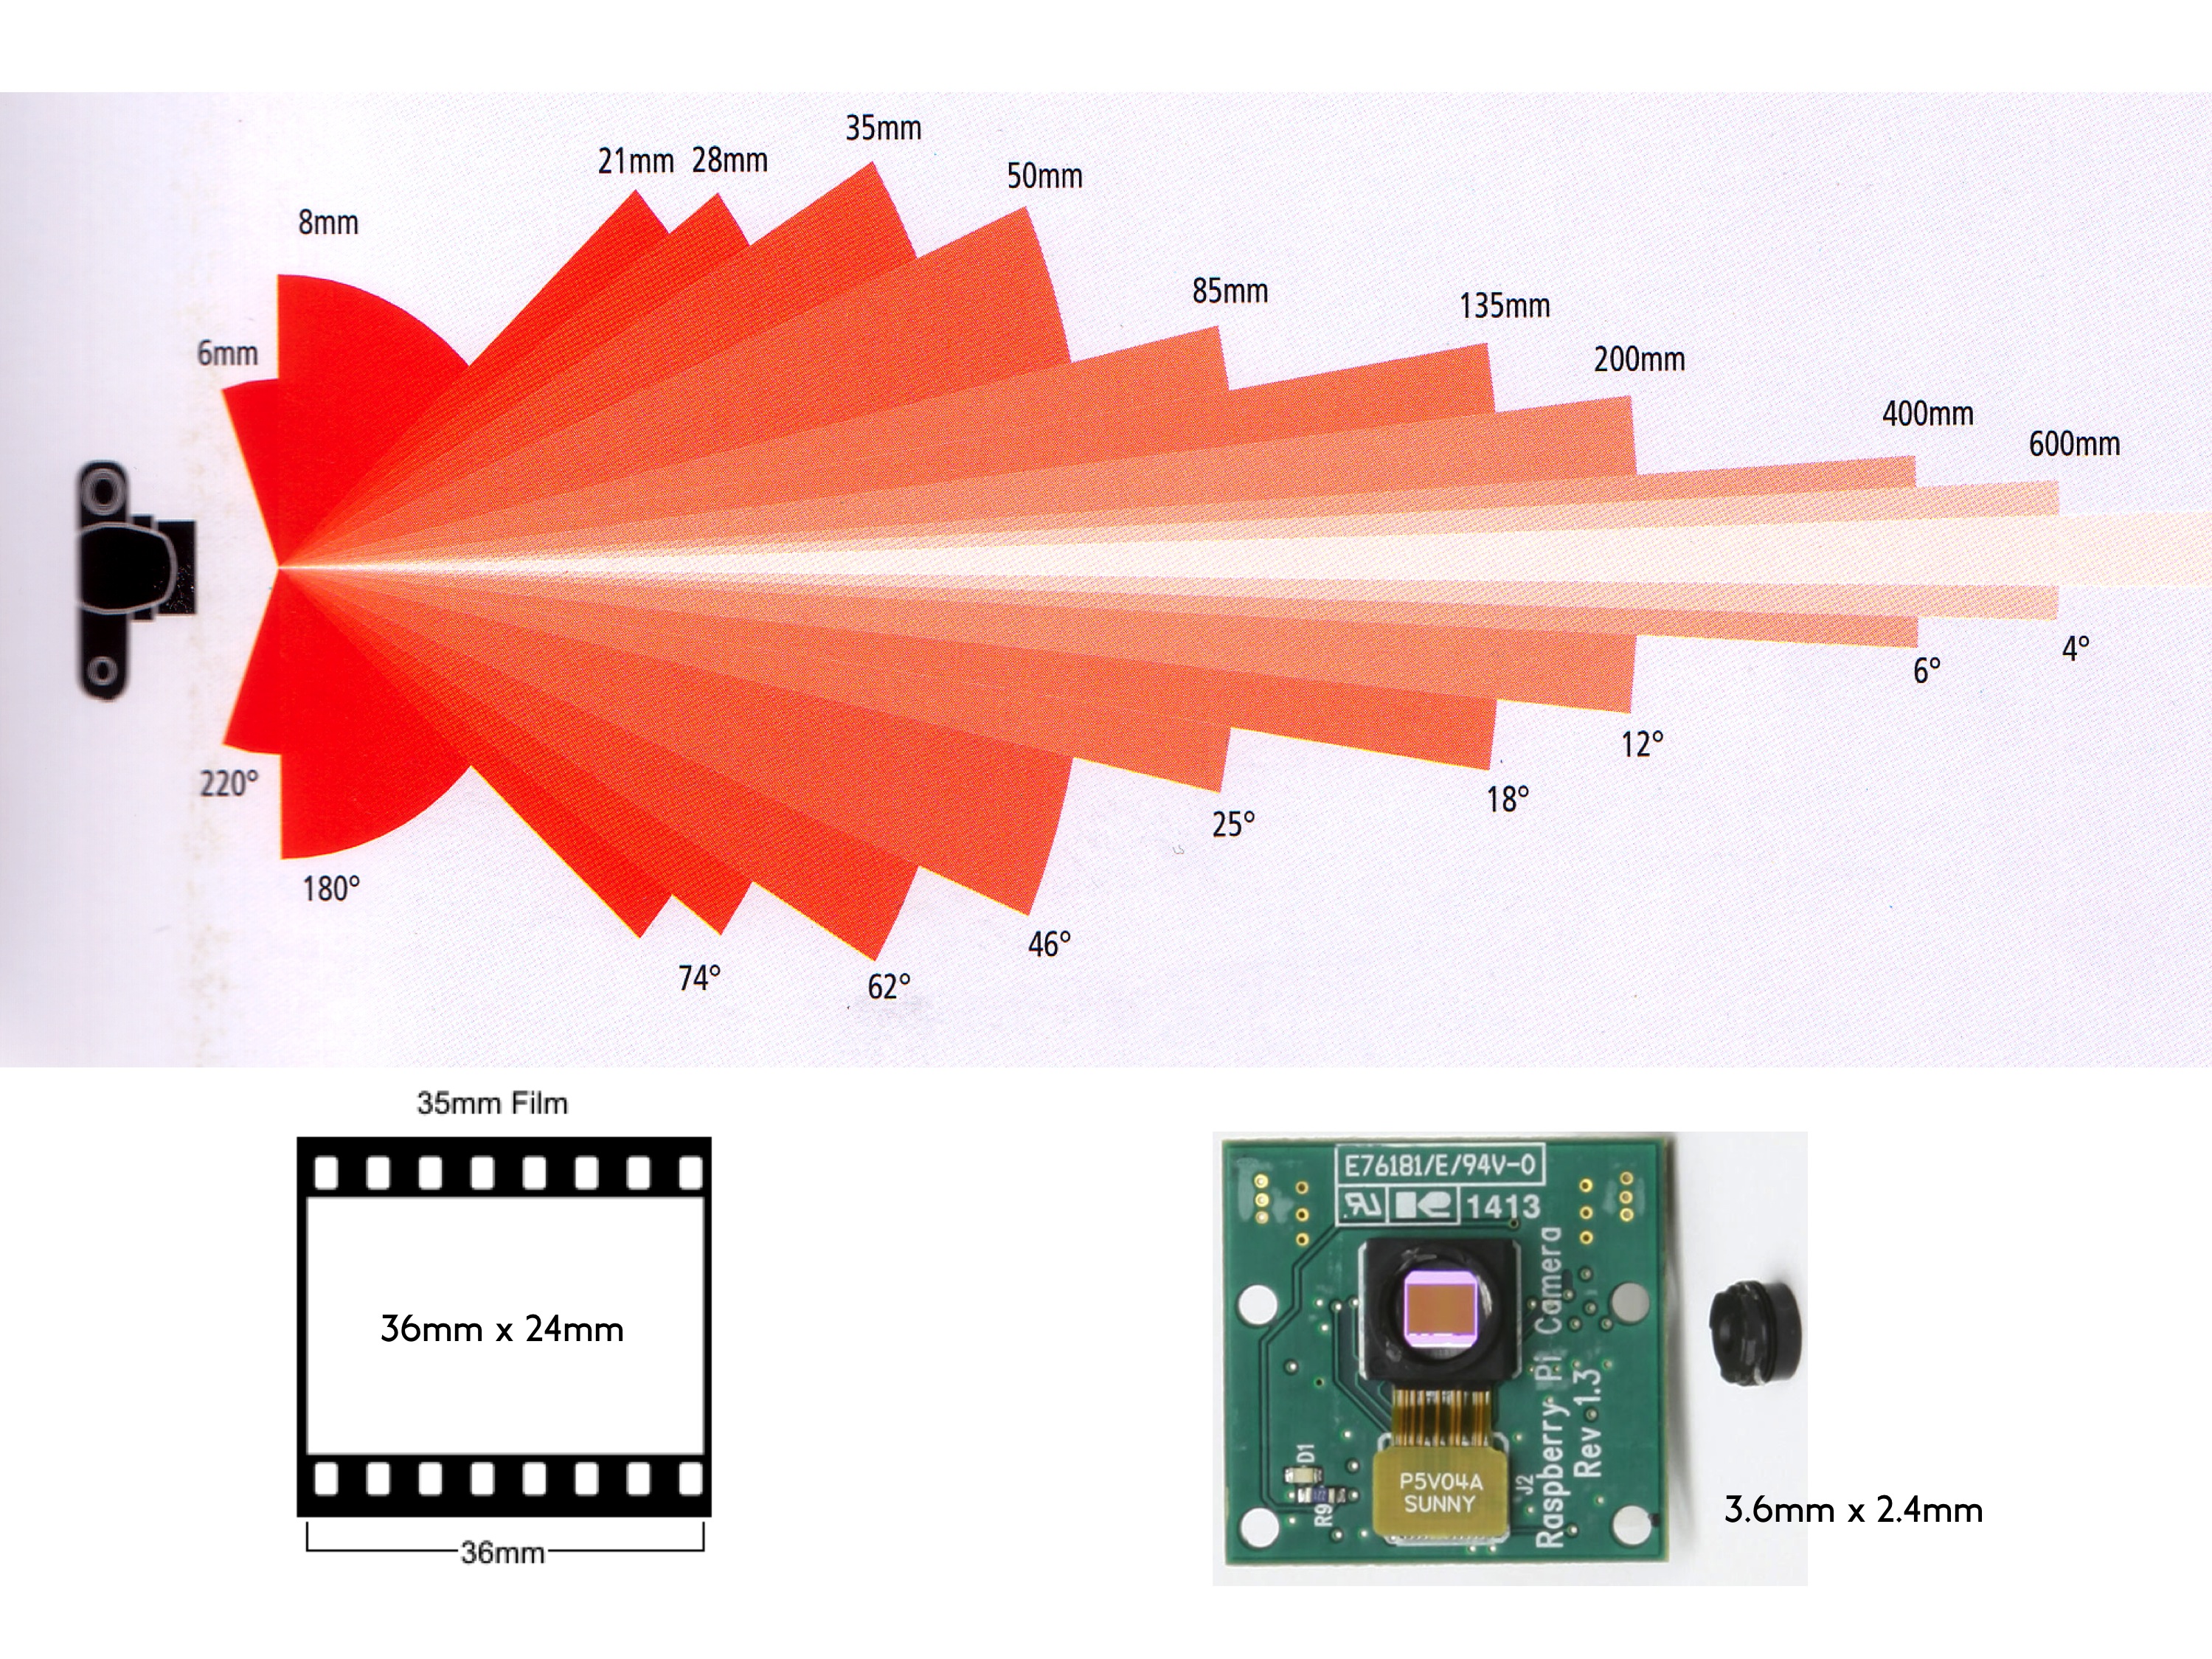
We’ve worked that out based on a standard 35mm film camera. A 50mm lens there gives a x1 magnification. A 100mm lens gives a x2 magnification. The focal length of the objective mirror in the PiKon is 800mm. So, for 35mm film that would give a magnification of x16. But the Raspberry Pi Camera sensor is just one tenth the size of a 35mm film frame. So effectively the magnification is increased by a factor 10 to x160.

Another way of thinking about the power of the telescope is the angle of field of view. If we place a 3.6mm wide sensor at the focal point of an 800mm lens, it subtends and angle of view of about a quarter of a degree. The moon subtends an angle of about half a degree at your eye ball, so we’d expect the PiKon to have a field of view that could capture about half of the moon. And that’s just what we get:

What is the limit of magnification?
The ultimate magnification of the PiKon is limited by something called Airy Disks. These are circular halos of light which surround a point image in the telescope. They are caused by defraction effects which depend on the size of the objective mirror and limit the ultimate useful magnification.
http://en.wikipedia.org/wiki/Airy_disk
The rule of thumb is that maximum useful magnification is 60 times the size of the mirror (in inches) or 2.2 times (in mm). The PiKon prototype has a mirror diameter of 4.5 inches or 113mm, which means its maximum useful magnification is x270.

Hi,
this is a very nice project! I’m currently building one myselfe.
Could you please explain why you have to remove the lense from the camera?
LikeLike
First you need to hold the camera (small plastic box with lens) with pointed nose pliers. Then with a second pair of pointed nose pliers, grip the circular lens mount and twist anti clockwise. It is fitted with a screw thread which has been fixed by Lock Tight.
If all else fails, score a ‘v’ across the lens fitting and twist with a sharp screw driver.
LikeLike
Thanks for your comment. Actually, the camera comes with a tool to remove the lens or change the focus.
But this is not the aswer to my question. I know how to remove the lense from the camera. I would like to know why it has to be removed. What would be the difference if the lens would be left in place, what are the benefits of removing the lens.
LikeLike
If you can get the lens to rotate in the body of the camera, then remove it by turning it anti-clockwise until it comes out. The reason that you need to remove the lens is because the mirror forms the image on the camera sensor instead of the camera lens. If you leave the camera lens in, it will not focus.
LikeLike
Hello,
Interested in the project, I wanted to know if the new Raspberrypi High Quality Camera (https://www.raspberrypi.org/products/raspberry-pi-high-quality-camera/) could work with the pikon telecope ?
Thanks for this awesome project !
LikeLike
Hi, sorry for the late reply. Yes, I’ve just designed a kit to allow the use of the new camera.
LikeLike
Thinking about to install the new HQ camera of Raspi instead of the V2.
The sensor IMX477 is with 7,8 mm about 2x the size of the old one, so the magnification would be halved. On the other side, the Pixel size is larger and there are 12mp which could improve the image.
Do you think it’s worth it?
LikeLike
Hi Jan, I’m trying to get hold of one of the new cameras. I’ve just designed a 3D printed adaptor so that the new camera can be retro fitted. I’ll put the .STL files up soon. I think that the new camera will allow longer exposures and improve the field of view.
LikeLike
I can confirm it. I bought the HQ camera and yes, the image is smaller but with much better details.
Maybe I will upgrade or some day with a Telrad to find other objects.
LikeLike
The advantages of the new High Quality Camera is a wider field of view and the maximum length of exposure is greater than the original cameras.
LikeLike
How is the focal length 600 and 800mm. I bought a 5 inch mirror with 1000mm focal length. How far should the tube be? I got a 6” sono tube. Will it work?
LikeLike
Hi, the current 500mm focal length mirror has a tube length of 600mm. So add 100mm to your focal length to get the tube length. This assumes that you are using the PiKon components in the spider and mirror support as the extra 100mm accounts for their dimensions.
LikeLike
For a 1000mm focal length 4.75” lens how long should the tube be? I am using a 6” sonotube and need to center and mount inside that with a smaller spider and focus part. Would it work?
LikeLike
Again, the current 500mm focal length mirror has a tube length of 600mm. So add 100mm to your focal length to get the tube length. This assumes that you are using the PiKon components in the spider and mirror support as the extra 100mm accounts for their dimensions.
LikeLike
Hi, with the new 12MP camera, I suppose the only thing that needs to be removed (or can be removed), is the mount piece attached to the new camera? I’m just preparing everything right now. Ordered the parts, camera and PI, will start printing tomorrow.
LikeLike
I tried the same first. However, the mount also contains the infra-red filter so I ended up removing part of the mount which has the tripod attachment.
LikeLiked by 1 person
Ok for what I can see without having the piece (apologies for my eagerness), that’s only the bottom part with 2 screws to be removed. Thanks! Looking forward to build this! Looks awesome to do!
LikeLiked by 1 person
Thanks for the enthusiasm! I’m hoping to ship on Tuesday. I’m short of two square nuts for the focus.
LikeLike
Thanks for the update! No rush, printing in progress anyway. I do have one more question regarding the tripod mount. Apologies for not being too familiar with this, but can you advise me what type of tripod is needed for this mount? I do have a standard Camera Tripod but that only has a small square head compared to the rectangular mount in the .stl files. Thanks a lot.
LikeLike
The rectangular mount is a wedge designed to fit an astronomical tripod. There is a screw thread which is inserted into it for mounting on a photographic tripod. The kit contains a 3/8” to 1/4” UNC adaptor which screws into the mounting wedge so that a 1/4” tripod screw can be screwed in.
LikeLiked by 1 person
Thanks for the clarification! Awesome
LikeLike
Hey there!
Im planning to use this telescope for astrophotography, do you think it would do a nice work? i didnt find any reference about that but with simple math i know its a 600mm focal lengh with a 113mm mirror that gives me a F5.2 should do a pretty nice work, right?
I was thinking to use the Raspberry Pi to develop a little program to control the focus, exposure time and control a equatorial mount, what do you think?
Thanks!
LikeLike
Hi Mariano,
Thanks for posting. I first need to correct a mistake of mine. The focal length of the mirror is now 500mm. The prototype was longer, but I’ve since been able to get hold of some slightly shorter focal length mirrors.
To give you an idea about what you can expect from the telescope, I’m adding a link to the latest feedback and images from a recent build: https://www.instagram.com/travellingtechguy/
The idea of PiKon is that the community would add and share new ideas and software. Some time ago, one PiKonian added motor drive so I’m adding his link for some inspiration: http://pikon.patrickaalto.com
It would be great if you could add to these ideas and if you need my help, just shout!
LikeLike
Hello,
can you explain how you calculate the correct tube length? 500mm vocal length means 600mm tube. But as I understood there are 610mm totally because the 3d printed parts?
And which role does the mirror lens diameter plays for the length of the tube?
Thanks
LikeLike
The tube length is the focal length plus 10cm. At present the mirrors that I supply are 500mm, but it is not critical because there is a lot of range on the focusing device.
Everything is designed for a 4.5inch diameter mirror. It’s only the focal length that has an impact on the tube length. I think some makers have tried using different diameter mirrors and tubes. They have hacked the files to do this.
LikeLike
Hi,
on the market there are not so many 4.5inch mirrors. This is the reason why I asked what would happen if I would use another diamter like d=50mm.
LikeLike
Great projects !!! Any results on the new HQ 12.3MP camera ?
LikeLike
Yes. Check out https://www.instagram.com/travellingtechguy/ on Instagram
LikeLike
yeah, I want to know the quality. I haven’t got mine complete yet (I restarted my blog and that’s the subject of my first post : http://linkintech.com/wordpress/index.php/2020/07/08/building-a-pi-telescope/ ) but I’m not excited about a pin looking moon. I wonder if I should buy the newer camera if its worth the much higher price or use some other camera that works with the Pi.
LikeLike
Hello,
which side of the mirror is inside and which outside ? At the moment I cannot see anything with my camera noir.
One side of mirror makes my face larger and the other makes it smaller. The side which makes me smaller is inside the tube and the side which makes me bigger is with the glue tape mounted.
LikeLike
I didn’t know its a two sided mirror. I bought a $39 mirror off amazon with a focal length of 1000mm and 4.75″ diameter from some astronomy company and it only has mirror on front side.
LikeLike
The mirror side (front) is on top of the glass. You should be able to reflect an image onto paper with it if you hold it at the focal length from the paper.
LikeLike
Do you use spherical or parabolic mirror?
LikeLike
The PiKon has a spherical mirror.
LikeLike